Featured

first things first

So if you’re on this page, you’re probably curious about understanding a little bit more about the specific asana poses, poses that you will be able to access through twisting, forward folds, balances, and so much more. The purpose of this page is to give you a little bit more information about what popular poses are, what the purpose and benefits of they are, and give you some photos and videos to use as references to begin to learn more and grow your practice just that much more!

While you’re reading these posts, it is important to understand that these poses come and go with time. Some days, I find myself in a perfect arm balance, on other days I’m struggling to even stand on foot. When reading, I encourage you to keep an open mind about the fact that these are not going to be accessible on the first time! Every pose, every posture, everything breathing exercise, all comes with time! The most important part is taking that time for yourself, whether it is 20 minutes in your kitchen or 90 minute class. If you practiced, you practiced, no matter what it looked like. 

It is also important to understand that each pose does come with modifications. Many of the modifications will be photographed or videoed, but like I said, it will be different for everyone!! When you’re practicing in a classroom setting, many classes will follow the same style and sequences offering those modifications and variations. Always keep an open mind and remember each practice won’t be the same, but it is still the practice that counts! 

I hope you enjoy these how to’s, I really enjoyed making them for you. 

my purpose

I had been playing soccer for close to 13 years, before I decided to move on to just running. Slowly, but surely, despite being a 16-year-old, I began to run into many injuries along the way. Ankles, knees, hips, even my spleen – but that’s a story for later. It becomes quite frustrating, not being able to love what you do. That’s when my mom stepped in (as they always do, right before you crash), and offered to take a yoga class with me at Inner Power Yoga, a studio very close to my hometown of Sterling, Va. It was by no means an extensive class, but after 75 minutes of breathing, sweating and about 10 minutes of savasana, I was hooked. Here I am, 4 years later and I can’t get enough. 

It wasn’t easy in the beginning. Some days were good, some not so great. Some days I would pool sweat, and other days I would become quite anxious and frustrated that all I was doing was stretching and laying down. I figured out quickly, especially coming from years and years of intense physical activity, that I needed more. That’s when I landed across a Vinyasa styled class at Inner Power. In 90 minutes, I walked away feeling strong, sweaty, sore and accomplished. Now that’s what I want to do. 

But again, some days are good and others are bad. Some days I can jump into a straight-pincha, other days I can barely balance on one foot. But that’s what I love so much about yoga, is that it’s okay. I once had a teacher say to me, “99 percent of the hardest part is showing up, the other 1 percent is your practice.” So that’s what I did, I kept showing up. 

As a college student, I struggle. A lot. I don’t love my body, I don’t make good eating choices, I miss my mom and my dogs, and I miss a bed that doesn’t need a 1 in. mattress topper. Classes are hard and the lack of sleep makes it no easier. Relationships come and go. Hell, I’ve even been to three schools in my first three semesters away. Talk about stressful. But what has stayed constant throughout my entire college career has been yoga. 

And of course, sometimes it’s hard in the morning to get out of bed to go to a studio, and even harder at night after 12 hours on campus. But I learned (and truly, am still learning) that the daily practice of yoga is therapeutic to me. When I continue a daily practice, I not only feel more confident and strong in my body, but it makes me want to be better. It makes me want to do better. To practice harder to stand up in that pose. To make a more healthy dinner tonight. To go out with friends and be in the moment, without the stress and anxiety of due dates tomorrow. I allow myself to accept who I am, body and mind. The practice of yoga allows encouragement and self-worth, reminding me that I am strong enough. I am enough. 

And I hope that these words can do this for you too. 

benefits of intermittent fasting

First and foremost, what is intermittent fasting? First of all, our bodies are designed to go several hours without eating. When we eat, food is broken down into molecules that enter our bloodstream. Vitamins and minerals are transported to cells that help our bodies and systems run smoothly. Insulin is a hormone made by the pancreas that breaks down carbohydrates and helps store excess energy. When we eat too much, those stores become full and sugar is broken down into fat. Intermittent fasting can help you lose weight by slowing the production of insulin, so when the body doesn’t have enough insulin to convert into fat, human growth hormones burn fat for energy. 

Intermittent fasting is a cycled pattern of eating and not eating. There are five steps:

  • 16:8 – Fast for 16 hours, eat over an 8-hour window
  • 18:6 – Fast for 18 hours, eat over a 6-hour window
  • 5:2 – Eat your normal diet 5 days a week and limit calories to 500 on 2 days of the week
  • Warrior diet or one meal a day (OMAD) – Fast for 20 ours and eat one large (and healthy) meal
  • Eat-Stop-Eat – Fast for 24 hours once or twice a week. 

So what is the right approach to intermittent fasting? How do you know you’re not hurting your body? Intermittent fasting takes a deliberate approach to planned meal times so whichever method of fasting you choose to do, it’s important to keep these things in mind: 

Eat healthy meals and snacks during eating periods: Just because the fasting period is over, doesn’t mean you should eat whatever you want. A plant-based diet that’s high in fruits and vegetables, whole grains, dairy and lean protein is the basis of all healthy eating. As always, avoid foods high in sugar as it can cause your body to spike in insulin. 

Lasting weight loss comes from lifestyle changes! Even though IF can be very successful for some individuals, if you are not taking care of your other aspects of your life. As always, healthy eating and regular physical activity is a key part in losing weight, but healthy choices including limiting alcohol intake and quitting tobacco products are very important in a healthy lifestyle as well. 

So what can you eat during fasting or eating periods? Along with a clear timetable of when to eat, there are also certain foods and drinks you should be avoiding or focusing on. During your fast, you can have water, black coffee or green tea. Make sure to avoid artificial sweeteners in diet drinks as they can break your fast and trigger higher production of insulin. When your fast is over, make sure to take a restrained approach to eating and not dive into shoving your face with everything in sight. Make sure you are staying hydrated first and foremost. Eat more whole foods and natural fasts like avocados, eggs, nuts and chia seeds. Always make sure to avoid refined sugars and starchy carbohydrates. 

As I like to talk about a lot on this page, is the beauty of balance. I know as working individuals, we do a lot and rely a lot on our bodies. But it is always, always, always okay to indulge every once in a while! I do my best to always practice a healthy lifestyle, but I will also never tell myself that I can’t enjoy the last cookie, or not drink at dinner with friends. As long as you are eating, drinking and working out in moderation and within balance, enjoy yourself! You deserve it. 

mindful eating

building awareness about what we put into our bodies and why

I am the queen of mindless eating (I say as I open a bag of sunchips). I eat when I’m bored, when I’m stressed, when I’m sad. And then, after mindlessly inhaling a bag of chips, I get frustrated with myself and my body, so an hour later I’m back again, stress eating some more. For someone who likes to say that they are in-tune with their body, yoga practice and such, why is it so hard for me to turn down a pint of ice cream once the clock hits 11 pm? In yoga, every time we step on our mat, we have to make decisions about what will be best for our bodies in that moment. For me, I often like to deepen my practice by adding more vinyasas and more strenuous exercises to make my practice a little more difficult. For others, you may like to skip vinyasas and add more stretching poses for a yin variation. No matter what you route you decide to take, it is okay as long as it is MINDFUL! With mindful eating, the decision lies in keeping discipline, such as meal preps, planned meals, and/or choosing the healthier option. It also lies in compassionate acceptance, such as being okay to eat the cookie or go through a drive-thru. Allow yourself what you need to take care of yourself in that moment. 

When I am often struggling with my weight, not being able to fit in a practice or not having time to cook a healthy meal and resorting to a quick and easy, yet junky meal, I find myself very hard and down on myself for not being better or doing better. One of my mom’s greatest advice to me is being able to find balance. In yoga, we learn that when trying to accomplish balance poses and inversions, that it may seem like we are perfectly balanced, however there is actually constant adjustments happening within our body – wavering finger pressure or wobbly ankles, core engagement, drifting gaze, and so on. It is all the same with mindful eating! We adjust our meals, weeks and diets to whatever life is throwing at us. So, like my mother says, keep it balanced. If I can’t make it to the gym or yoga studio in that day, maybe skip the ice cream after dinner. But what if I had a kick-ass workout? Go out to drinks with your friends! Do not ever limit what you can and can’t eat for the sake of your sanity, enjoy your life and that cookie! As long as it’s balanced. 

Recently, I have been focusing more on how to eat to lose weight. There is only so much yoga I can do in a day, but even so if I come home and emotionally eat five pieces of pizza, it doesn’t matter how much exercise I really did. What I also really struggle with, is social eating. I’m incredibly social person, and the easiest way for me to catch up with a friend is to share a meal! Easy, efficient, but mindful? Not so much. So how can we use mindful eating to our weight-loss benefit? Again, what do I mean by mindful eating? It means putting the phone down and turning the TV off. No more multitasking while eating! Enjoy what you eat, nurture what you eat, and importantly enough, BREATHE while you eat. When you are focused on what you are eating, as opposed to scrolling or swiping in one hand with a fork in the other, you are more than likely to consume about a third of what you normally eat. If you are listening to your body, rather than the television, you will notice a lot sooner that you are full, therefore able to control the amount of food you eat. When you eat in silence, you will have the ability to find yourself at much more ease, not having to worry about what else is coming next, but really enjoy the moment with yourself and with that silence. 

It is important to ask yourself if you are physically hungry for food or something else, like comfort. Make an effort to not eat when you are distracted and be able to differentiate the two, and become more away of the healthier choices you can make. 

the purpose of moving daily

As a college student, this is something I struggle with often. From taking 15 credits, having a job, being a member of a sorority and many other clubs and extracurriculars, it is very difficult to be able to find an hour or two in a day day, to put all of my other responsibilities aside and be 100% on my mat. Moving our bodies is so vital for our mental health, strength, healthy skin and so much more. There are many ways I have tried to implement at least 60 minutes of exercise, 5 times a week into my routine including:

Enjoying the activity that I’m doing! If I turn going to the gym or yoga into a chore, I will only dread doing it more so. By finding activities that I enjoy, and switching up my routine (different types of yoga, taking a long walk outside, different youtube videos, and so on), I am much happier to break up my regular routine and get out of the library or classroom for something fun and different every day!

Be active in your daily life. As students and adults with jobs, we are often sitting at desks and chairs for most hours of the day. Rather than taking the elevator, take the stairs. Instead of ordering food to your desk, walk to the nearest shop and grab something. There are so many simple things that you can do throughout your day to ensure that you are not glued to a chair and moving around, even for just 10 minutes, to get your heartrate up and ensure some movement to make you feel better. 

Pay attention to your amount of screen time and take a break from technology. When I spend hours and hours in front of a laptop getting homework done, more hours staring at a screen at work, and then finally go home to and binge watch Love Island and catch up on Instagram. Rather than spending more time in front of technology, I can use that extra free time to go outside and move around. 

While those three steps are very broad and brief, they are such simple and miniscule ways to change your entire routine to fit in even just 30 minutes of moving your body! Personally, days that I don’t get enough exercise, I often find myself eating more at meals, wanting to snack more on unhealthier food and most importantly, not sleeping well enough. When I do get that extra workout in, I feel more motivated, energized, sleepier and healthier. Put in that extra work and you will too. 

my personal favorite yoga classes and exercise recommendations

  1. Alo yoga/alo moves: My most favorite way to exercise online! Alo yoga is a clothing brand that has taken their platform and allowed for their customers to be able to practice from the comfort of their own home. What I love most about the videos is that they offer a free version and a paid subscription for about only $120 a year (or $17-20 a month depending on the subscription you choose). I often use the free YouTube videos because I go to studios around my area as well, but the videos offer a wide range of power style classes from anywhere to 30-60 minutes, or meditation and yin classes as well. The paid subscription does offer a variety of different style of classes as well, along with meditation classes, series and more.  https://www.youtube.com/channel/UCsksmxdgJtJp18iMYQpJg0A
  2. Pamela Reif: Pamela Reif is an individual trainer that makes anywhere from 5-30 minute videos, focusing on separate parts of the body to work or full body workouts as well. She varies from yoga classes, “Good Morning” stretches, classes with or without gym equipment and more. What I love most about these videos of the accessibility of them. They are short and sweet and easy to do anywhere. I often do them in the middle of a yoga flow (for instance, a 10 minute ab workout) or at the end of a sequence (like a quick stretch). You do not have to pay for any video on her page, so you can pull them up on any device anytime and anywhere! https://www.youtube.com/user/PamelaRf1/videos
  3. Sjana Elise: If you are familiar with her, you know her love for life is absolutely radiant (maybe sometimes overbearing, but I’m doing some breathing exercises to get over it lol). I follow Sjana mostly on instagram, where she posts many flows of IGTV, but she does have a couple on her YouTube page as well. What I love most about her page is that she not only posts yoga flows, but lifestyle posts as well including food and clothing hauls, guided meditation, vegan recipes and more! She offers a very well-rounded platform to go to for healthy lifestyles and tips. 

Like I said, I normally stick to studios around my area for a regular practice, but with life always getting in the way I want to find more ways to incorporate home practices into my routine. Share with me some of your favorites!

studio recommendations in Harrisonburg, VA.

What I love most about going to school in Harrisonburg is the ability to try new studios around downtown. These brief recommendations do give you a little insight to what the studio may offer, however I do encourage you to do your own research before picking one that you think might work for you (prices, class styles, etc.) – and remember they all may work, or you may just have your favorite one. That’s the fun of trying them all out! 

When picking out a studio that you enjoy, you must figure out what works for you. Personally, I love a very high energy studio with high temperatures and hard classes. But for others, they may prefer a much more yin style of yoga and not want to be pushed too hard in class. When I am practicing in a studio I love, it is because I am inspired by the teacher, but even more so, the teacher is inspiring me to do more and want to try more! When choosing what works for you, you really do have to be listening to your body and what YOU want. If I can give any piece of advice before you begin looking at my recommendations, it will be to not pay attention to anyone around you in the studio. If the person to your right is a super fit 20 year old in a handstand or if the person to your left is a smelly hippie, who cares?! How do YOU feel when you walk out of the studio? 

  1. The Nest – Yoga and Fitness Studio: Dedicated to providing inspiring, approachable and affordable classes for every body. This studio offers a variety of heated and non-heated yoga classes for the beginner to the advanced practitioner, as well as Pilates, Barre and Meditation classes. In addition to the weekly yoga and fitness classes, they offer on site massage therapy provided by Cedar Stone Spa, private and semi-private instruction and off site instruction. 
  2. The Center Yoga: The center of downtown is Harrisonburg’s first dedicated Yoga and Pilates studio. It offers a welcoming atmosphere, students are able to feel safe, encouraged and challenged. The studio offers a wide range of Yoga styles for yogis of all levels, ages, and backgrounds through well-trained, devoted and top instructors in the area. 
  3. Shenandoah Yoga: This studio offers weekday morning, prenatal and gentle yoga classes as well as workshops for anyone – young or old, fit or inactive, stiff or flexible, novice or inexperience can do yoga and benefit. 
  4. Rocktown Hot Yoga: With a strong belief that hot yoga has the power to transform the body and mind, Rocktown strives to provide a safe and loving community for everyone to enjoy the healing benefits of hot yoga. Rocktown Hot Yoga offers 90 minute 26&2 classes. These will be the same 26 postures and 2 breathing exercises that take place in 105 degree heat and 40% humidity. These classes are great for beginners and long time practitioners alike. It also offers heated flow classes taught in 98 degrees and are vinyasa style yoga, classes centered around matching movement to breath.

How to: Half Moon Pose (Ardha Chandrasana)

Continuing the trend of standing balance poses, I am going to dive into one of my favorites, but also a pose that has been the most difficult for me throughout my years of practicing. It is in an incredibly fun pose, and even more so to modify, intensify, add-on to and so forth. Similar to eagle pose, half moon pose focuses very much on leg and ankle strength, bringing even more strength to the core as well. This pose is normally taken during a triangle series (utthita trikonasana) – also one of my faves). 

To get into this posture, perform triangle to the right side of the room (in order to get into triangle, from your downward dog, move into warrior 2 with your right foot facing the front of the room, as you straighten your right left, if necessary, you may shorten the distance between your feet. From there begin to tilt your torso over and reach your right hand towards the front of the room until you can’t go any further and tilt straight down, either bringing your right hand to the toe, floor, shin or of course, a block). 

Once you are in triangle, inhale and bend your right need, sliding your left foot along the floor. As your left leg moves, bring your right hand forward until it is in a straight line with the left hand which is in the air. It is important here to understand that gaze and breath (as with in any balancing posture) are the most important. For many, especially when you are beginning working with this pose, bring your gaze to the floor and in front of the foot that is grounded. As you become more comfortable with the pose, you can begin to bring it to the side of the room in which your whole body is facing. 

Exhale and press your right hand and right heel firmly into the floor. Simultaneously lift the left leg parallel to your mat. Extend the lifted leg and flex the right foot, activating it as much as you can. Activation helps with your balance and strength. 

Rotate your upper torso to the left side of the room (in which you are facing) but keep the left hip moving slightly forward. Most beginners should keep the left hand on the left hip to guide it, and their gaze on the floor. 

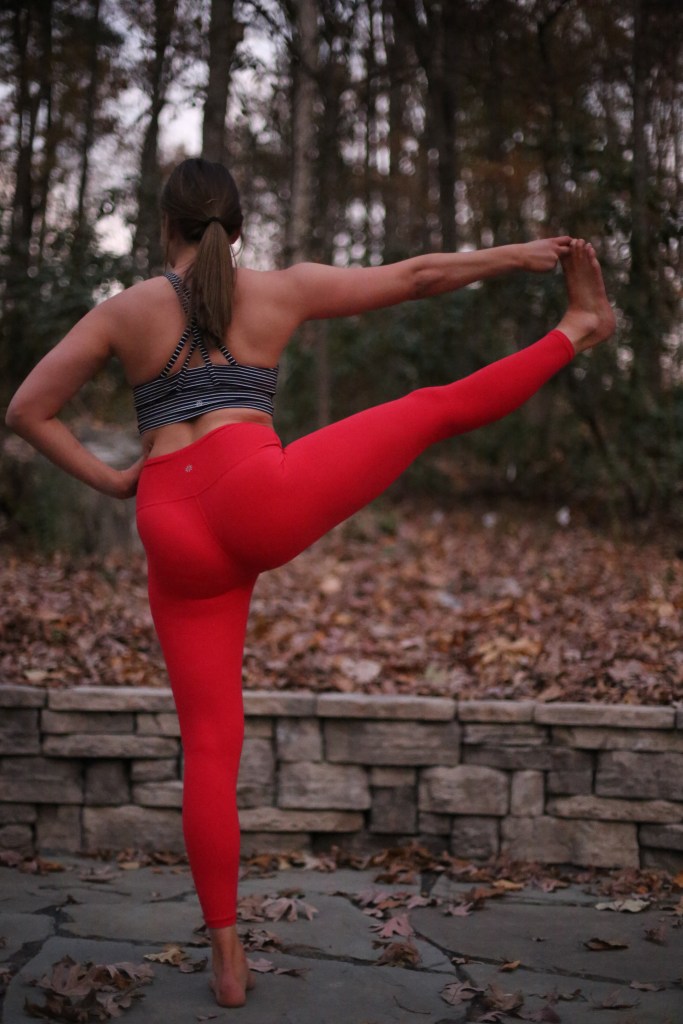
All of the body’s weight should be on the standing leg. Press the lower hand lightly to the floor, using it to regulate the balance. As you become more comfortable with the pose and your balance, it is possible to work towards bringing the arm up and forward, like you would in dancer’s pose. Make sure that as you continue to activate the floating leg, the leg you are standing on is just as straight and strong. 

Once you have completed your desired amount of breaths, lower the raised leg to the floor on an exhale and return to triangle pose. You may either vinyasa between poses, come into a revolved triangle, or simply just complete the pose on the other side. 

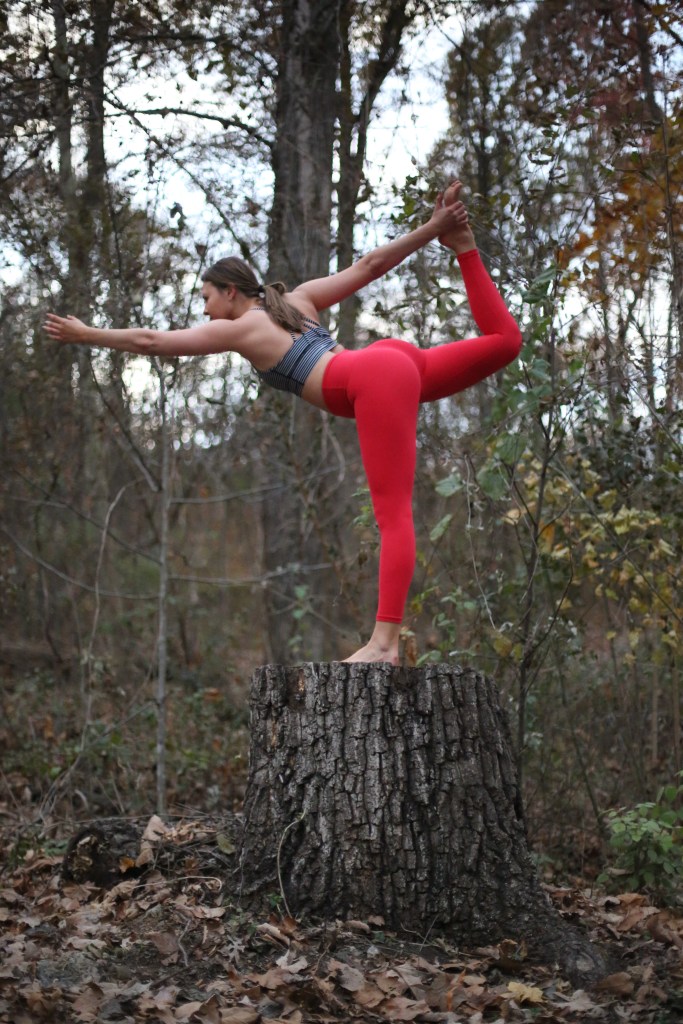
As always, there are many modifications to this pose. As mentioned before, the use of a block below your hand is always useful. If you are an advanced student, you may begin to move the raised arm towards the raised leg, bringing the two to touch. Once your grip is on the outside of the standing foot, begin to push the foot into the hand, and arch your back, almost as if you are in dancer’s pose facing the side of the room. This is called [ardha chandra] Chapasana. 

How to: Eagle Pose (Garudasana)

So far, I haven’t really focused on many standing balance poses which really are my favorite part of a practice. This is the time in my practice that I most focus on my breath, balance and strength. What I love most about eagle pose is that it not only strengthens your thighs, legs and hips, but it also serves as a shoulder and neck stretch. 

As always, when you are doing poses that require both sides, always begin on your right side.

To begin, start in mountain pose (tadasana). On an inhale, bend your knees, bringing balance onto your right foot and begin to cross your left thigh over your right. As you fix your gaze at a point in front of you, hook your left foot behind your right calf.  – if you are unable to hook your left foot, you always have the option to leave your left leg wrapped around your leg as your foot is resting on the floor behind the right foot. 

Extend your arms right in front of your body, bringing your left arm under your right. Bend your elbows and then raise your forearms until they are perpendicular to the floor. Wrap your arms and hands, and press your palms together. With each inhale, continue to lift your elbows and reach your fingertips towards the ceiling. On every exhale, drop your shoulder blades down your back. – If you are unable to press your palms together, you can also bring both of your forearms together, coming into a big prayer or hold on to a strap. 

Once both your legs and arms are wrapped, square your hips to the front of the room and draw your belly button to your navel, engaging your core as much as possible. Bring your gaze to the top of your fingers, continuing your ujjayi breathing. 

There are many benefits to garudasana, when practiced with correct alignment it will bring poise and strength to your practice. Keep in mind when you are performing the pose to be squeezing both your arms and your legs. In order to sit deeper, keep your inner thighs firmly pressing throughout the pose – think about both your right and left leg turning into one. In order to keep your hands, arms and thighs in one straight line, continue to squeeze your forearms and hands together. 

How To: King Dancer Pose

There are many benefits to dancer’s pose including strength in the legs and core, and improving balance. It also allows to open up the hip flexors as a counter to tight hips!

Begin in mountain pose (tadasana) with your feet hip widths distance apart and weight equally distributed in both feet. Begin to shift your weight onto the right foot and bend your left knee to lift your left foot off the floor. 

With an inhale, bring both hands to the sky, with your gaze following. Lower your left hand and grasp the instep of your left foot with your left hand, keeping your right arm straight up to the ceiling. 

Lift your left leg behind you and kick your left foot into your left hand. Bring your belly button to your spine in order to keep your balance and core strength. Remember that your left knee should not splay out to the side. 

Continue kicking your left foot strongly into your left hand to lift the leg higher, as this will begin to deepen the backbend. Hold for however many breaths you deem necessary. Lower your left leg back in line with your right and repeat the pose on the other side. 

There are many common mistakes to this pose, so make sure of this little adjustments in the pose to ensure that you are not injuring your ankles, knees, or lower back and hips. 

Your standing knee should be slightly soft, not locked, hyperextended or overly bent. Engage your quadriceps to keep supporting your soft knee. 

Keep your hips square and kees aligned with the hips so you don’t have a rotation that mars the alignment. 

Remember! You can always come near a wall and use your arm in the air for balance if necessary. If you’re having trouble bringing your lower leg up or reaching it, always grab a strap and wrap it around the bent leg to assist you. 

How To: Utthita Hasta Padangustasana (Extended hand-to-big-toe pose)

Utthita hasta padangustasana is a standing balance posture, that can be completed on both your left and right side. It’s important to keep strength and straightness in the standing foot in order to keep a solid balance. 

From your mountain pose – tadasana – bring your left knee to your chest (this indicates beginning on your right side, as you are going to be balancing on your right foot). There are two modifications you can take in this pose, first being grabbing your knee or if you’re looking for a more advanced posture, grab your big toe with your peace-sign fingers. 

In order to straighten the leg, firm the muscles through your thighs with an inhale. If you are comfortable, begin to draw your straightened leg out to the left side, bringing your gaze to the right. Once you’re in this position, bring your navel to your spine sucking in your core as much as possible. It is most important to remember to keep your standing leg as straight as you can, even if this means that you have to bend the leg in the air. The posture serves to strengthen your standing ankle and leg, if the leg is not straight you will only put more of a strain on your ankle. 

After holding the extended leg out for 5 breaths, begin to bring the leg back to center and on an exhale bring the extended left leg down to meet the right on the mat. Make sure to repeat on the other side to ensure balance on both sides of your body! 

Design a site like this with WordPress.com
Get started